All in all I am super pleased with the final result it's really grand. It's turned out a lot better than I imagined. I can't believe how much work we have got done in these past three weeks, I think there were time when me, Anna thought it might never end. During this project I feel like the fact that things take longer than you plan really hit home. I felt I spent a lot of time making to do lists and remaking them because everything took longer than I thought it would (except editing but I found a lot of shortcuts to make this faster.
The parts of this project I really enjoyed were designing the set, and working with Anna to make these items come alive. I also really really loved working with Becky and Elliot on their storyboards, even though the storyboards don't reflect the conversations we had, I feel like they were super productive conversations that really helped solidify their narratives and made them eager to start.
I think one of the hardest things I found was directing someone to do the voice acting. But I re-did it and overcame this. And the easiest made so much easier by the fact I had the creative task to do for Disney was the Editing, I whizzed through that like a whizzy queen.
I feel like I haven't looked at documentary animation as in depth as I could of done but instead I've been much more involved in actually doing rather than looking at other stuff. But at the same time, I think I have been so productive in my own practice, and this project is the one that I'm proudest of, of my uni course. I also think that the skills I've learnt in this module are going to help my extended practice so much. It's go me so hyped to start off my extended practice sooner because there's so much I want to do with the stop motion. Like building tracks in woodwork to roll through the sets and planning this in advance. ITS JUST SO EXCITING.
Friday, 15 May 2015
Distribution Poster & DVD Box
What to put on the back of a DVD Case:
http://www.dvinfo.net/forum/wedding-event-videography-techniques/119879-what-put-back-cover-dvd.html
This website is jokes, come factor on tracey's wedding great research
http://www.dvinfo.net/forum/wedding-event-videography-techniques/119879-what-put-back-cover-dvd.html


http://www.dvinfo.net/forum/wedding-event-videography-techniques/119879-what-put-back-cover-dvd.html
This website is jokes, come factor on tracey's wedding great research
http://www.dvinfo.net/forum/wedding-event-videography-techniques/119879-what-put-back-cover-dvd.html


Whilst I put together the posters, Anna wrote the text and the biographies for us, and we selected the pictures together. TEAM WORK IS DREAM WORK <3
Thursday, 14 May 2015
Soft Box Photo's and Group Poster

So I took some nice images of Sven and Gordon in different poses in the soft box for the group poster, and some solo shots of sven (see softbox photos folder). It was nice to play around with the finished guys and take nice photos.


I then proceeded to collect the characters off everyone and make a group poster. Mike had a lot of complaints about the font choice so I changed it to simplifica for the names and lower bit but he and rosy still didn't like it. In the end I sent it to rosy to finish because I did spend a good few hours on this and I couldn't deal with having to do my animation as well. She ruined it. Absolutely destroyed it. I think personally the geometric type font looks cool, but you know I wasn't actually that bothered because it's no big deal it was just a bit of banter.
Post Production


Before and after of blue sparks shot with fast track colour grading.


So Post Production.
What did I even do?
Well for starters I colour graded the poo out of every shot. Some of them went a bit crunchy and had a lot of noise, but there was a wide variety of lighting options so I really tried my best to even out the shots. But for my first time colour grading I don't think I did too bad. I used the fast colour correct tool. I did try just doing an adjustment layer to all of them but it didn't really even them out, I thought it just made it look worse because a few of them were so different. I didn't mind doing them individually it's just like what I've said for everything in this project though. Everything takes so much longer than you think it will. It's a nightmare. I also add RGB curve changes to a few of them.
Blue Sparks:
So I also added blue sparks to a few of the stun gun shots, I did this using video layers on photoshop and drawing with blue and grey with the brush and then just smudging it. I thought it would be the fastest and most effective way to create them. Also because it's smudged onto an alpha layer the check of the trousers shines through it so it doesn't look like it's been drawn on, if you open the first blue sparks psd file you can see the few different types I did.
TicToc Clock:
I also added ticking to the clock the same way I did sparks only I didn't smudge it because it's so far away I felt I got away with that. I really struggled to draw straight lines on the tablet I borrowed from uni I think it need recalibrating, but that's okay I made a feature of them. I think these two bits of animation make the piece seem more finished and less still so I'm really please with that.
Green Screening.
http://www.premiumbeat.com/blog/10-free-smoke-stock-videos/
So I used ultra key on premiere to green screen out the door windows and then I watched each of these ten videos and chose my favourite to key in behind the doors. I love it. It's like one of my favourite shots the smoke behind the door. Also it was a choice not to have perfect greenscreen, I made it agressive in the settings and keyed it all out but I actually really like the grain aesthetically so I kept it.
I did however have a nightmare keying out the white light behind the characters in the doorway I'm still to fix that tomorrow's plan.
I also tried to add credit's today but the font wouldn't install on the computer so I'm going to install it on my mac and do them on photoshop after, I think that will be easier.
One thing I found was that I able to apply all my knowledge from the disney interview of editing, making sure shots start on the sound etc etc to this task which is why I think I managed to get it done in the end.
The best feeling was showing Anna and seeing how happy she was with it. At this stage she's the only person whose opinion matters on the project and she's happy (she thinks we could even leave the white in behind the characters in the door but I think it would look smarter without, it shouldn't take too long to mask out in after effects). Hopefully.
For the Green screen I fixed the other shots, by taking the comps into After Effects and placing subtract Masks onto them.

I don't think it looks fantastic by any means, but I think this is isn't my talent and isn't a skill I want to be accomplished in because I'm much more of a pre production person, but I think it's shows an idea of what we wanted it to look like.
Wednesday, 13 May 2015
Lighting & Filming


WELL THIS WAS STRESSFUL.
So I'll give a brief bit of description of our process and the difficulties. But to be honest, I would rather focus on the post production and get this finished on time rather than write this blog post, so I'm going to keep it short and sweet. And I'm going to say if you want to see photo's of this then please see the lighting folder.
So Monday I went and took out, two tripods from photography, a slider a head and a decent lens from Matt. Then I proceeded to use three Dedo lights around the set.
Then I didn't even know where to begin setting up the lighting. I've never lit a set of this size (everything I'd done previously has been a lot smaller and has required just a desk lamp), and even though we'd had the 3 point lighting induction it was really difficult to know what to do when you're actually doing it. It's like all that knowledge flies out of your head. So I'd booked with Matt Burton to help set up the lights, because I know that's what he revels in. I hope my tutors didn't take offence for me going to Matt for this stuff, I just find that when I do certain things with him I actually take it in easier and remember what he's saying. I really wanted to focus on edge lighting and it's like we are on a more similar wave length so he gets what I was after, also because this was done 3/4 days before deadline there was always other people constantly needing help so it was just easier to book a few hours with him get him to teach it so I remember it and can do it myself next time. So he came up we did some test shots of several scenes, and then I tried to re set them up and I plowed through and I think I must have been rushing the shots, because I went and looked at the footage with Matt and it was pretty shocking. Such terrible lighting. I might have shed a few tears, freaking out. But it's because I really wanted to do Anna's models justice more than anything. I also wanted it to be dark and broody. But in hindsight (even though I could have used this time to do some serious blogging) I'm really glad this happened because I learnt so much from it. From the importance of lighting and ISO and aperture (I already kind of knew this but now I really understand how it affects the difference in picture) to where the lights needs to be so you don't get flat lighting (on the corners). In the end I got Matt to come back again on the wednesday, and he helped set up an overall lighting setup that we could use for every scene. I'd bought some Foam Board because he'd suggested bouncing off that and that was the final result. See photo's for our test set ups and how they developed. We tried a few different positions of it clamped up to give it a fill light. Then I just moved a flagged dedo around to create edge lighting. Then for the door scene we used the LED light behind the door to get the silhouettes.
I also borrowed a HDMI screen off Matt B because our set was a bit too big for the area we were filming in. As for the slider, it was a bit of a failure. It wasn't really long enough, or able to get close enough to get smooth enough shots. I think next time, I'd go down to wood work and make my own tracks that could go in the set to get more sophisticated shots, with the railings in the middle of the set we just couldn't get into it well enough.
Also during filming the set walls fell down, so I borrowed some sandbags from Matt to be sure that it wouldn't happen again.
I kind of just took the lead and got on with it when it came to filming the Shots. A part of me felt bad for not including Anna, but she did say she wanted to do certain poses so I did make sure I did these shots with her, but because she has so far to travel she normally gets in early and I stay late, so I really wanted to get them all done on wednesday because I knew there was going to be a fuckload of post work and editing to do. I really didn't want to leave less than a day for this. At the same time though I found that when I was doing it by myself I was a lot faster at it, if we had more time then I would of been more than happy to do it really slowly and show Anna how to do it effectively, and I plan to on Monday for PPP but for the sake of the deadline and the fact that I know she doesn't enjoy this part of the process and isn't enthusiastic about it. I don't feel the need to do that, when I actually enjoy it I might as well just get on with it, was my rationale, and I'm so chuffed with some of the compositions of the shots. The one of the pigs heads swinging on the railing is so arty, I'm just like that's the dog's bollocks fiona well done. Some of them are shocking though so I didn't use them but I took enough to be able to make that judgement which is good.
I have to say I was a bit heart broken when I came in the next morning chipper as a Bee and I could tell Anna really really wasn't impressed with them. She said they were too dark. And I can understand why she was a bit gutted because she's spent ages modelling them and wanted them to be in bright light to show off her modelling skills, but I just thought that's why you get the lovely softbox photos of the bits to show off in your portfolio, this is about a really dark subject, it suits being dark and edgy. But because of this I was extra meticulous with the post production to make sure she was happy with it. (She was really impressed in the end I think she was just a bit stressed about it, which I can understand because I did take the control off her from this point, but because of the task I had for my disney interview I knew I'd be able to boss the editing side).
Costume Making (& Anna's amazing casting head skills)

Because we were so short for time, in the end I moulded Sven's head out of plasticine and Don let me make a little silicone mould for it but then Anna cast the foam in it so I could go off and do the Laser cutting of the grates and grills. I didn't mind doing this because it's not like I've missed out on learning a skill because I still got to use silicone and we have already cast with the foam before, and Anna didn't seem to mind doing this so it was all good. It was a little sad that Sven had large air bubbles around his nostrils, but I think he would be a very pock marked human if he was alive so I didn't mind.


Although Anna cast and painted the faces, they were quite green so I gave my head a pink overlay of paint. I also used plasticine for eyeballs.

I was really proud of my elasticated waistband on the trousers. And the swishy cross panel on the shirt. I hope next time we have more time to make clothes this was one of my favourite parts. So excited for extended practice to revel in this. We made sure that even though we weren't making the costumes together the puppets looked like they belong together by using the same material.

Friday, 8 May 2015
Final Crit after Easter!
For this crit, we got to present all our work we've done over easter for solidifying the narrative, to having built armatures, plans for the laser cutting and a successfully completed induction, we also had pictures of Anna's initial casts and moulds and a three week plan to successfully boss this project.
Our main feedback from the crit was that the sound with Jimmy needed re recording. The exact words were that I needed to play him animal cruelty video's break him down and make him cry then record that. I don't think I could do that too him. I don't think we are good enough friends!! haa!


Our main feedback from the crit was that the sound with Jimmy needed re recording. The exact words were that I needed to play him animal cruelty video's break him down and make him cry then record that. I don't think I could do that too him. I don't think we are good enough friends!! haa!


One week to go crit!

in this crit anna chose some of her favourite font's for the credits and poster out of the ones I sent her and we decided to ask in the Crit what suited the project best


We also showed the storyboards and the animatic, and generally it got a good review, they appreciated Gavin's recordings better than Jimmy's but were unsure of the wording of Naye's: we do care, eat meat but source local, and think it should say source from ethical butchers. Me and anna discussed it and decided to just drop it because it's quite wordy and we probably won't get time to re-record it with naye because we still have all the shots to film.


We also showed our production photo's for the week, we've got so much done this week, I'm really proud, but with a week to go we still have a lot to do so I decided to make another Plan of Action. I've found myself making lots of to do lists this project but losing them as I'm going along, but because I've written it down I generally tend to remember.
So At the weekend I'm going to get the costume for Sven sorted, anna's going to get the framework made and then on monday we can spend the morning setting up and taking equipment use mon/tue to film post on wednesday, marketing on thursday then friday finishing touches evaluations etc and boom we will be done.
NB: this didn't quite go to plan, we just got as much as we could do each day.
Thursday, 7 May 2015
Animatic and Background Sounds
So I wasn't expecting the animatic to take me quite as long as it did to do. But I really took my time with the audio track, because I thought it would make doing the final mash up easier if I had an audio track I could just copy and paste.
I found most of the sound effects on freesound.org it's my usual go too place, they have pretty much every sound under the sun. I'm really pleased with some of the placements, like the way the whip noise is perfectly on time and how I've faded the bubbling water up and down in volume around the speech. As background noises I added noises of the taps dripping and of piggies oinking.
I think I may have to move a few of these really short sounds around when it comes to mashing the actual shots together, because it's good to have a visual change when the sound changes and I'd rather work with the best visuals and move the sound, but I think this is a really good foundation track to work with for the final sequence.
Laser Cutting


So for the laser cutting what happened is, I didn't know how to work illustrator and Rosy was really struggling finding facts and research for her Diet mograph, so I basically said to her, look if I find you a range of research will you draw out these grates and grills on illustrator for me. So we swapped computers and cracked on and it took us both about half an hour to do these tasks and I think it would of taken me a lot longer to do it myself so I'm really glad we did this and Rosy had some decent research to use for her mograph so it was a winner winner chicken dinner.
However when I took it down to woodwork the file wouldn't work, from this I learnt to always take your file to Mike Flowers because Roger isn't brilliant with Illustrator, in the end he also thought the proportions were wrong so Anna went and got a puppet and we talked through proper dimensions of the grates so that they were big enough to show up on screen as well, and then Roger showed us how to draw them out on CAD. He was lovely about it, we took up a lot of his time but I was really grateful for the help. CAD seems like a great design program too. The laser cutter took an age to print out, so during that time I looked up loads of fonts and sent them to anna to go through and choose her fave.

This was my email to anna:
This laser cutting is taking the piss, so I'm looking at fonts for titles, the coolest free ones of 2015 off creative bloq and awwwards and web designers and D&AD so on.
So no. 1 Refuge, I like the handmade feel of it, but I don't think it's slick enough for our project. It's pretty cool though I might still download it on my laptop
This is like a cleaner version of it shape wise, I think it would make cool for the title page, but I think we should find something that will work for all the press stuff, so this is a contender at the moment
ooo this one is nice and vintagey, or do we want it to have a more modern feel to show that it's still happening today?
another vintagey one but it's a handdrawn font called sunday
if we want to go modern, I think this is one of the nicest modern fonts that's trending at the moment that's free, nairobe is the top one but I was thinking Chelsea.
A few others for consideration:
This is one I use a lot so I never know if it is actually suitable:
At least it's another thing we've considered, let me know what you like.
xx
Armature, and Padding the Armature

So me and Anna both bought an armature from animation toolkit, I had a go at putting it together, it took me an evening, but then I realised I'd glue the wrong bits. The instructions weren't very clear, and I glued the pins in the joints instead of the sticks to the joints. I had to get Anna's help to fix it and we had to get leon to undo several of them.


I got this far before realising it was wrong. I also thought the sticks they gave me for the legs were either too long or too short so I took them down to leon to get shortened.

Then I stitched stuffing round his limbs to fatten him out, I made his butt cheeks and belly and moobs all swirly so they flexed easily in case the clothes were tight.

I also asked Anna to do my fingers because we had so many tasks to do I knew she could do them faster than I could.
I think next time I make a character, I'll leave a lot more time for it and try and make a silcone mould for the hands and feet instead of using tape (although it was a quick solution in this instance) (like in the paranorman video above). I really really enjoyed sewing the clothes, I think it would have been easier if he had been a skinny character. I love this video. I just love Laika. <3
Woodwork 7/5


So I took the supports down to woodwork and carried the big walls and got the doors cut out. I got to drill the supports, and one of them is a bit unsteady, but it should be alright, I asked the technician the most stable place to put them in to distribute the weight and we went for a quarter of the way in each side for the big boards. I also had some smaller supports but he didn't think they would do much in the way of supporting so I just left these off.
Update: Unfortunately these supports were not strong enough for the walls when push came to shove, because of how the grout had made the walls warp. They fell over and broke the tap, so I added sandbags onto the back of the supports for all other filming, but I've learnt next time that this is something I'm going to have to research when the set is this big. (ooo extended practice exciting).
Sound Recording, Myself and Gavin TAKE 2!
So after such negative reviews at the crit, kind of had to re record it, I recorded them myself as emotively as I could so I'd know how to direct someone better. I also tried changing the pitch but it didn't sound like a male voice so I asked around and eventually got Gavin to do it.
It took a lot longer than it did with Jimmy. Like more than several attempts for each recording. I deleted a lot of them because it was mainly Gavin muddling his words putting on a morose voice. We also had to do the ones with the questions in several times to get some passion and anger into it. But it was pretty straight forward really.
Matt and Annabeth both commented that did it matter that is was an American in the voice over, well no because they are quotes from an American book.
Again I think it's good quality recordings, and it was worth spending a couple of extra hours on it because we've got better results with Gavin. See sound file for recordings.
Wednesday, 6 May 2015
Elliot's Storyboard


So Elliot asked for help with his storyboard because he knows how much I love storyboarding, and he didn't want to spend time recreating his previous ones in maya when what he enjoys is making the sets, so I agreed to help out because one of my favourite things is bouncing ideas back and forth about shot set ups, and I find it's easiest to do this when a person is really enthused about a project. So we discussed a lot his current shots and how we could use third's and so on to make them better. We spent a few hours discussing each shot in detail and the most concise way to tell the narrative through it, and how we could save him time by him doing certain shots that he could repeat. I'd like to think I gave several suggestions that improved his animation but I think the main ones include that of the glass bottles on the shelf with creepy liquid (possible body parts in) and how he could make his life easier if he planned how he was going to film the machine in the second room better. After this I made me him and becky tea and they went home and left me to make the storyboard.

Panel 1:
Close up of cow eating food
Mirrors the very last shot of the animation, so it could loop you could film it once and use the longer version for the end shot.

Panel 2: Another angle possibility to pan round this shot.

Panel 3:
Possible shot of floor level of fire place. Ideas for fire, include putting wood in and doing the flames in post, or just making three sets of flames and alternating them every time.

Panel 4:
A zoom out of the previous shot. Fades to black here, dramatic, oo.

Panel 5:
Side shot of the cow entering machine room, pulls lever, lever noises insert here.
Question: Does this shot fade from black or cut straight to it?
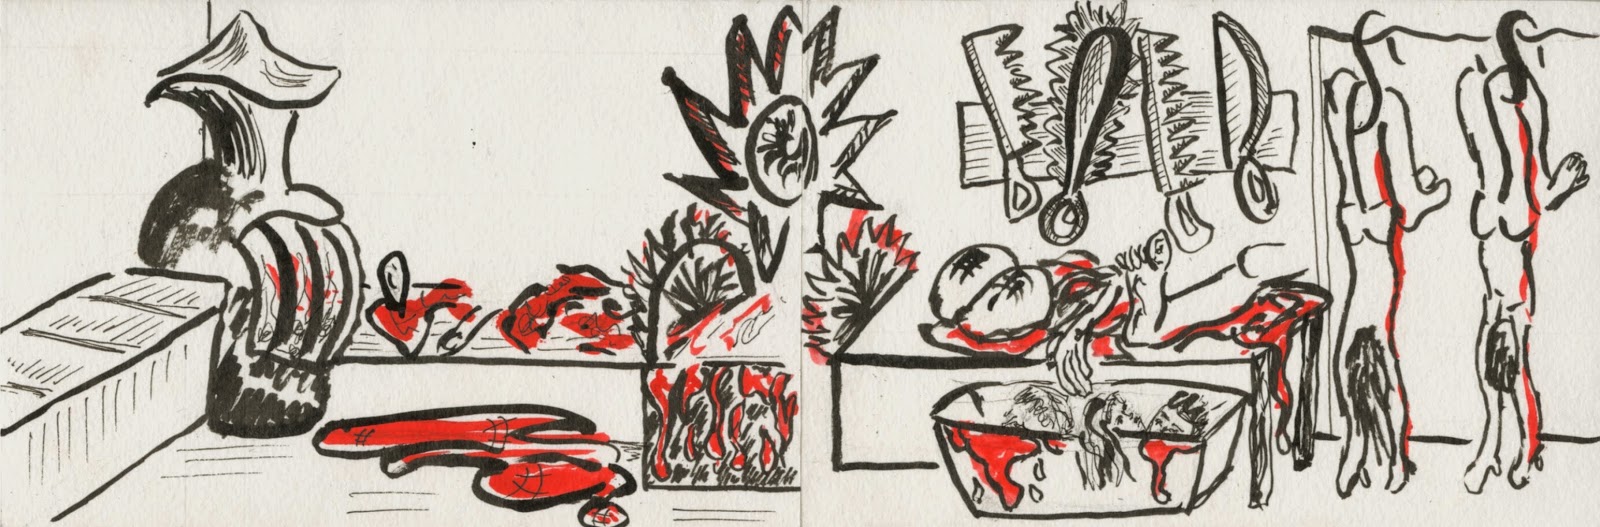
Panel 6:
Tracking shot of the machine at a stand still

Panel 7:
Possibilty of a bird's eye view

Panel 8:
Close up of Furnace, from here fades to black again.
But here we did talk about the possibility of the food moving along the final part of the conveyor belt and through the the next room but you were unsure of how the mechanisms would work. We considered several options.

Close up of the steak falling from the chute and then it zooms out to the position of the first shot and the cow gobbles it up.
Shot 10:
Live action of meat for credits.
Subscribe to:
Posts (Atom)